Showing posts with label underlining. Show all posts

Friday, December 28, 2012

Finished Project: The Holiday Dress

My sewing plans for this month kind of turned out to be the opposite of what I'd originally thought. It seems as soon as I announced I wasn't going to sew a holiday dress and mentioned I would be sewing a Christmas gift for someone, I began working on just the opposite. This season, my sewing ended up being rather selfish, but sometimes that's what it takes to get you out of a little sewing rut!

I had been looking on Etsy at vintage party/cocktail dresses to wear for the holidays and wasn't really finding anything in my price range that I was in love with. I really wanted something green and preferably with a bow (or two). At one point, I decided to have a just a glance through my pattern/fabric stash and found myself pairing my lightweight, emerald green, cotton sateen with New Look 6910.
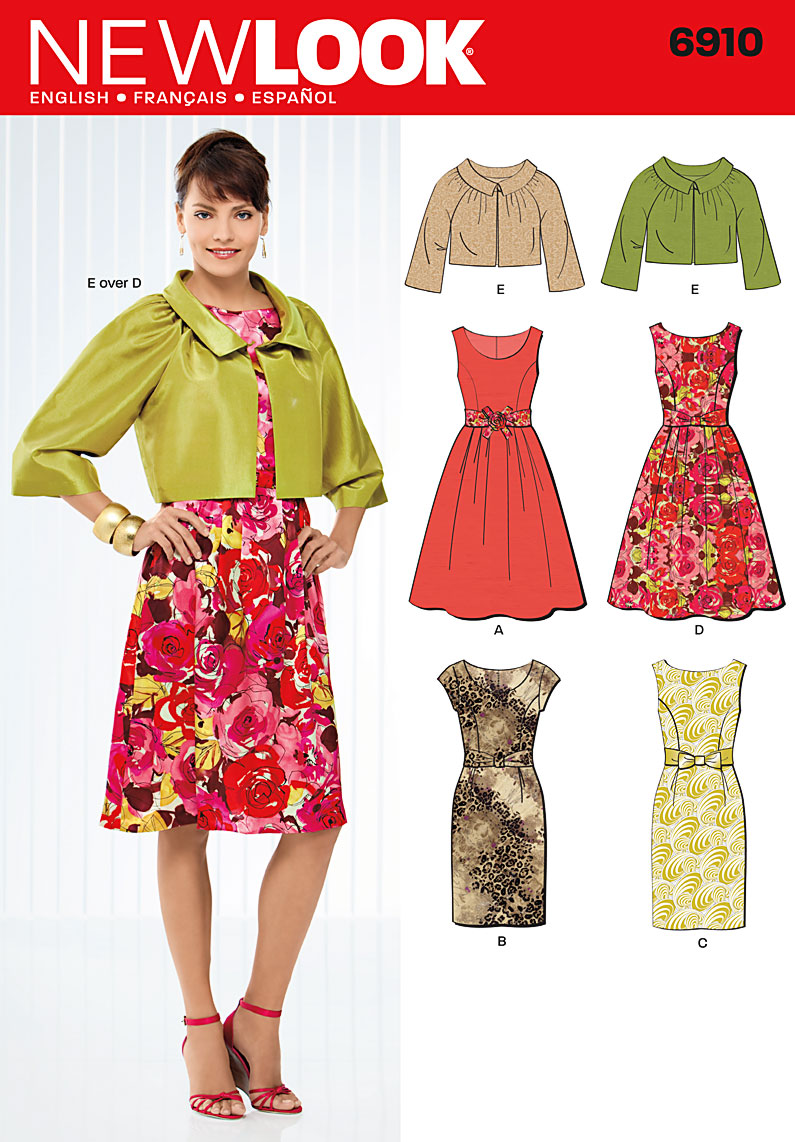


Once I had them unearthed from my stash and waiting for me on my sewing table, there was no turning back - I dove right in! I didn't even deviate from the versions provided in the pattern (no mixing and matching of bodices and skirts, like I usually do). I made a straight view C because it had the straight skirt with two little pleats, strapless boat-neck neckline, princess seamed bodice, and all-important bow at the waist.


Action shots courtesy of Mom & Dad on Christmas Eve.


Because the fabric I'd chosen is so lightweight, I lined the bodice with muslin and underlined the skirt with it as well. Then I cut a 3rd skirt (the first 2 were fashion fabric and underlining) out of some synthetic, swishy, mystery fabric that's white with a cute black and red pattern to line the skirt. I'd picked it up at an antique store in my early days of sewing (I think I'd planned to use it for a blouse? Ew.).


side - front - back   ...the back doesn't look so rumpled and strained on me when worn, just on the dress form. ;-)


some detail shots. the beloved BOW, and the bodice and skirt lining


This project held a few "firsts" for me. It was my first (successfully) fully lined bodice. Luckily the directions were right there in the pattern and I was FINALLY able to wrap my mind around the way to do it. It was also my first time doing this type of combination of lining and underlining, which worked out well, I think. The last "first" ?, I did my first ever hand-picked centered zipper. I glanced at Gertie's instructions from her book, and just went for it. The thrilling part was having such control over the zipper insertion. Normally I am a mess when putting in a zipper and they pretty much always turn out somehow wonky. This one is by no means perfect, or even very pretty to look at, but I was in control of the placement and didn't have to wrestle with my machine. It was great! I can't wait to try more hand-picked zippers so that I can eventually make some that look nice.


dress' insides and hand-picked zip. for some reason my fabric coloring would not photograph well at this point...?


If I make this pattern again, I'll cut a size smaller (I had to take it in a LOT!) and lengthen the skirt by a few inches. I did a tiny hem and the finished dress is still a little shorter than I'd really like. All in all, I'm quite pleased with this little dress. I'd been really wanting something in a deep green shade and am so glad I was able to make this fabric work. I even managed to finish sewing it just in time to wear for the holiday. Merry Christmas to ME!

Sunday, February 26, 2012

Finished project: Violet

When I found out about Julia Bobbin's Mad Men challenge (bonus: she's currently hosting a giveaway for some amazing deep purple silk peau de soie!), I pretty much dropped everything and obsessed over what character's dress to use as my inspiration, blah blah blah. But, then I started to feel guilty for abandoning my already cut-out Violet blouse, so, once I'd squared away my Mad Men inspiration, pattern, fabric, etc., I decided to finish up Violet. I don't think I've officially announced this, but one of my goals for the year is to produce a minimum of one piece a month - my "Good Intentions" dress was January, Violet will take care of this month, and my Mad Men dress will be March. Yay for goals!
Here she is! (Still struggling with photo lighting, but had some help from filmmaker boyfriend.)
So, if you remember, I was a little bit intimidated by some of the elements of this blouse - mainly the 7 buttonholes. In addition to the buttonholes lined up down the front of the blouse, the collar, puff sleeves, and yoke were actually all firsts for me. Oh, and working with this type of fabric - Swiss dot. All in all, this blouse was easy to sew up and the instructions were clear and simple to follow (thank you Colette Patterns!). Where I struggled was really with aspects of the project that were...well, more my fault.

Fabric choice, for instance. The Swiss dot fabric was annoying to work with. It frayed a lot, everywhere, and as soon as I'd carefully hand-tacked the back neck facing to the back of the shirt, to keep it from flipping up, the stitches tore through the thin fabric. Also, it's pretty sheer, and, being used/vintage, happens to have some areas of slight discoloration that I only noticed once I'd started sewing. Boo.

When I did start to sew, I'd thought I was being such a smarty pants by changing to the smaller needle recommended by my machine manual for such lightweight fabric, but still found that any stitches I made and removed left rather visible holes in the fabric, especially in portions that were not underlined (like the sleeves and back yoke). That's right, I did underline most of the thing, to cut down on the see-through factor, which also helped bulk up the finished blouse a bit (in a good way). Without underlining, this baby would have been a sheer, wispy sack, if you ask me. 
Tucked into a vintage green wool skirt I never seem to have anything to wear with.  (The corner of my sewing area seemed to have the best lighting.)
I also struggled a bit with getting the blue chalk marks off of the fabric once I'd sewn up the pieces, especially on the darts. Amateur issue, I'm sure.  Did I mention this fabric is see-through? Anyone have a recommendation/secret for getting chalk out of sheer (or any) fabrics? I tried some water after brushing the marks off didn't work, but to no avail. Maybe I should have used some other type of marking tool?

The dreaded buttonholes proved to be another issue. At first, I was pleasantly surprised that I was able to better control where my machine stitched the holes, compared to buttonholes I've tried in the past (maybe I'm getting better?), but I still made some mistakes with how I'd marked them and ended up having to rip out two whole buttonholes and re-do 'em. Then, also due to my poor marking skillz, I managed to attach the bottom three buttons onto the placket just ever-so-slightly unevenly, so they don't quite match up with the buttonholes. This resulted in some bunchyness once I buttoned the blouse. Whatever, though, this is something I can go back and adjust later.

And my big mistake? I wasn't paying attention and sewed the buttonholes on the left side of the shirt, instead of the right, like a guys' shirt. Meh. :-/

Giggling at the cute cameraman. (Ack, I need a haircut!)
Lastly, the collar. I do love a peter pan collar. In a perfect world, though, this collar would lie flatter, but I can live with it, or try to fiddle with it later. I think there may be an issue with the fit of the neckline which causes the collar area to gap in the front a bit, in addition to just not wanting to lie flat. Maybe next time I'll try cutting a smaller size? Also, I wish I'd been able to make the shape of the collar more even, but that'll just have to wait until next time, too.

Despite all of my issues and complaining, :) I think I'd definitely sew this pattern up again - just maybe not with such thin, sheer fabric. I know some sewists out there in blogland mentioned that they found the Violet to be a bit too boxy on them, but I like the loose fit. It's comfortable (I don't have to suck in my gut, yay!) and makes it easy to tuck the top into a skirt or something. It does make for a more casual look, though.

If you're thinking of trying out Colette Patterns' Violet, here are a couple of my favorites I've noticed around the internets. (There's also a flickr group with about a million beautiful examples) Check 'em out and get inspired!

Tuesday, January 31, 2012

Swiss dot considerations

Okay, I'm not stalling on my Violet project, I promise! I just have to figure something out before I cut my fabric and really dive in. The fabric I chose for my adventures in Violet-making is ...you'll never guess...polka dotted. White and green swiss dot, actually. It is lightweight and rather sheer and I'd figured I'd end up wearing an undershirt of some sort with the finished product.

Poorly lit vintage swiss dot & little vintage clear buttons.
another fabric shot?
After seeing this and then lladybird's underlined swiss dot Violet today, I started to doubt my plan. I think I need to underline this baby...but with what? I'm not sure if I have enough fabric to underline with the swiss dot and I'm not even sure if that would be a good idea. The dots would surely show through and could potentially look odd. I don't have anything else white and lightweight, though. Any recommendations? Cotton batiste? Bah, I don't know! (Okay maybe I'm allowing myself to be paralyzed by indecision a little bit here...not purposely stalling, per se.)

Tuesday, January 17, 2012

The "Good Intentions" Dress

Fabric: Light-weight navy and white cotton for main fabric, muslin for underlining
Pattern: Colette Patterns' "Peony"
Year: 2011
Notions: 20" vintage zip - navy, store-bought red piping, thread
Time to complete:  several hours, over a few days (3 day weekend)
Total price:  ~$30.50 total --  ~$10 for the fabric, 50cents for the zip, $2ish for piping, & $18.00 for the pattern (the expensive part...but I'd definitely make it again)

Peony, piping, polka-dotted cotton, and matching vintage zip.

Similar to my intentions when taking the above picture (despite the bad lighting, etc.!), my intentions for this dress were good...I promise! I even made a muslin of the bodice because I'd heard through the internet sewing grapevine that this pattern's bodice generally required a little bit of fitting and tweaking. But wait, there's more. I decided, why not try underlining (for the first time) for this project, since I had a rather lightweight fabric for a pattern that specifically noted the suitability of "crisp, medium weight fabrics." (It did give the dress a nice weight.) I even took it a step further and used the same soft muslin material to underline the facings, instead of using fusible. How fancy am I! 

Used Tasia's advice re: underlining a bodice and dealing with darts.

Well, just because you've created a muslin doesn't mean you'll automatically be able to determine which ways to adjust it to perfect the fit! Also of note, underlining makes for bulkier seams, which, when combined with underlined facings makes bulky, fiddly shoulder blobs seams.


with a thrifted belt, from the front...
and the side...(ignore my dopey face!)

...and the back.

One final product I did like is the sleeve cuffs. These babies were inspired by Alana's and Adey Lim's cute little curved cuffs. I decided to use contrasting navy/white striped fabric from my stash with a pop of red piping (I know, it all looks rather patriotic and a bit nautical--but I'm ok with that!).


Doing my darndest to stitch super close to the piping.
Trying to figure out how the heck to construct and attach them.
Ta-dah! Fancy cuffs!


Cute--just ignore those bunchy shoulders!

All in all, I'm fairly pleased with this dress. Maybe I'm ready to veer away from the polka dots for my next project. And I didn't really make any progress in the fitting department, other than actually creating a muslin, which I never do. But, I'll wear this dress (once I finish the hem -- I hope no one noticed!). Also, maybe I can find an in-person class on fitting...because it seems like no matter I how much I read about it, when it comes to actually identifying what to alter on my own projects, I'm clueless! I guess the only thing to do is to just keep on trying and practicing and making. :)