Showing posts with label peter pan collar. Show all posts

Friday, March 18, 2016

Finished Project: Vintage Simplicity 7683


This dress and I had a history before I even wore it. As soon as I saw this copy of the 1960s pattern sitting on a shelf at the antique shop, I was like YES. A few months after bringing it home (two years ago) I got to work sewing it up. I had found the perfect fabric at my local thrift store -- well, when I say fabric, I mean pillow cases. It was a set of huge, old, king-size pillow cases in the cutest pastel floral print. I'd been wanting to try sewing with bed linens for a while -- they're soft, come in fun prints, are easy to sew with, and the price is right. They can be super cheap when you can find used pieces in good condition at the thrift store!

This was my chance: great fabric + great pattern = great dress. Right?


A photo posted by Sue (@sue1656) on


A photo posted by Sue (@sue1656) on


I guess the answer is sometimes... or, maybe in due time? Either way, this one took a while. I'd cut all the pieces out, interfaced where needed, sewn the shoulder seams, attached the collar and neckline facings, started on the button placket, and then totally given up. It was one of those times when you read and re-read the instructions, then try to execute them but things are not matching up and you cannot figure out why. After an afternoon of that joyful experience every sewist is familiar with, I decided it was time to give it a rest. I just wasn't going to get it then and I needed to revisit it later. I didn't know that "later" would turn into two years.


While reorganizing my sewing space in a bout of pre-spring cleaning, I came across the poor unfinished object (UFO) in a drawer and decided it was time to take another look. It turns out I had sewn two edges of the button placket structure together that were meant to stay separate. Makes no sense unless you've sewn this pattern, but I think you get the idea that it was just one little mistake that was holding me back. Once I realized what I'd done, I carefully followed the instructions and finished up the dress.


I pulled matching lavender buttons from my stash. They were a bit smaller than recommended, so I spaced them out and added an extra one to the placket. They match the purple in the fabric perfectly! I forewent facings for the armholes and used bias tape to finish those. I'd thought I was being so smart when cutting out the fabric because I'd let the hem of the pillowcase be the hem of the dress. Once I tried it on, it was way too long, and the side seams were wonky because they should've been a little curved/angled (a-line shift skirt shape). I ended up chopping off all the pre-hemmed length and doing a tiny hem with more bias tape as a facing. Thank goodness I was able to make it so tiny because I managed to chop off a bit too much skirt length, and made this mini dress a super-mini.


I can live with the short length, and the fact that the dress is a little too small in other areas, too (since I cut it out so long ago, my measurements have changed). Now I'm just delighted to be able to remove it from my Fails list from this old post and am loving the final look. The fun fabric and buttons and cute collar make me happy every time I look at them!


I'm already dreaming up another version of this dress with some printed cotton from my fabric stash, next time I'll leave slightly smaller seam allowances to give myself a little extra room, since it's a single-size vintage pattern.

Saturday, October 12, 2013

The Pilgrim Peony

You may recall I have a polka dotted Peony with striped & piped cuffs that I made when I first started this blog. That was my first ever version of this pattern and, with more experience under my belt now, I realize I should have cut a smaller size, among other things. I had been so excited about how I was going to sew it and what fabrics to use that I'd kind of ignored the less-than-ideal fit of the finished dress.  Well, I mentioned it, but at no point did I stop the project to try to really fix it. Unfortunately, the thing never gets worn now. Anyway -- it's time for a new round of Peonies.

At first, I had been a little over-it when it came to the Peony pattern, thinking that maybe it just wasn't for me. And it had sleeves, which I've only recently become comfortable sewing. Then, I saw this adorable version over at Sewbon. It hit me that, duh, this is a versatile dress that would really look cute and let a beautiful fabric shine. If I used a solid color of a nice bright linen or something, I might really like it!

Since fall is here, I want everything to be orange, red, or gold, haha, so I snapped up some of this pretty, Orange linen blend at Fabric.com, with plans to make it into a NICE, satisfactorily-fitting, Peony. Is this going to be a good color on me? Don't know, but I was definitely drawn to it.


Carrot colored linen blend, from Fabric.com


However, none of the above noted Peonies are what this post is actually meant to share! Instead of cutting right into my new bright fabric, or making an annoying bodice muslin out of plain, unwearable fabric, I opted for a wearable muslin, of sorts. I used a kelly green double-knit polyester heap of fabric that had been lurking in my stash. I can't quite remember how I came across it, but probably some early, misguided online fabric shopping from my earlier days of sewing. I added a while collar and thus created my latest Peony; The Pilgrim Peony.  (I know you're not supposed to use fabric that's this drastically different from your anticipated final fashion fabric when you make a muslin, but whatever!)


Please excuse the iPhone photos, I'll have better ones once the dress is totally done. That's right, I've left off the finishing touches on the sleeves, so this is still technically a WIP. I've also done a few other weird things -- since this fabric is thick polyester and is not prone to fraying, I didn't finish a single raw edge or seam! I was also able to leave out the center back zipper since the double-knit fabric is a bit stretchy. AND, to make my futuristic/Jetsons'/pilgrim/'60s collar, I literally just used the facing pieces that came with the pattern. Is that weird? It makes the corners at the shoulder seam pointed, rather than curved and I kind of like it. The inside of the neckline is finished with matching bias binding. Oh, and I also omitted the gathers at the front of the skirt and just added a pleat on each side. I didn't think this fabric would lend itself well to little gathers.


The only thing I have left to do now is come up with an idea for finishing the sleeves. I could just hem them at this slightly-shorter-than-the-pattern-calls-for length. Or, I could add a little pointy, white cuff to match the collar. Or, maybe just a white band/cuff that's plain, not pointed? I really can't decide. Any recommendations?

Sunday, September 29, 2013

Peter Pan Pendrell Replacement

My original Peter Pan Pendrell


Back in January, I was inspired by a peter pan collared Pendrell blouse made by Anna of Paunnet. I ended up making my own peter pan Pendrell, in teal rayon challis and loved it. I loved it so much, in fact, that I wore it and washed it a few too many times and it started to fall apart in any little place I'd not finished the seams 100% perfectly. I just recently parted ways with it (which felt weird, donating a me-made) and decided to make a replacement. I had just enough of the teal rayon left over to whip up a Laurel version, to fill the gap the Pendrell had left in my closet (and life).


I used the same collar as what I'd drafted for my pink Laurel top and simply rounded the pointed corners in the front to get the look I wanted. I used French seams throughout, and instead of completely foregoing interfacing in the collar (as I'd done and regretted in the Pendrell version), I used muslin to interface it, which worked pretty well. I also got to make bias tape and grinned the whole time -- for some reason I love this tedious task.


I'm so glad to have this blouse back in my closet and ready to wear! The soft collar for this version makes it easier to layer than my pink collared Laurel (which as been restricted to warm weather wear only).

In writing this post, I've just realized my next project, currently in the works, is also inspired by pieces Anna has made. As soon as I saw her recent post about her pinafore project, I started purchasing patterns and cutting fabric. More on that soon!

Wednesday, January 30, 2013

Finished Project: Teal Pendrell

Ahh, how nice to have a completed project. Even though I felt distracted by all of the sewing inspiration swirling in my head over the weekend, I managed to finish up my Pendrell blouse. Yay!

In keeping with the color scheme of the pattern envelope (oops!), I sewed this baby up in a teal rayon challis from Fabric.com that had been sitting in my fabric stash mountain for a few months, hoping to become a blouse. It's very soft and silky, and feels great to wear. I just love the color, and I've got a little bit of fabric left, so I might try to incorporate some of it into a future project.


As you can see, I picked the simplest version, View C, and added a peter pan collar, which I drafted using Gertie's instructions from her book. I know you might not think "Pendrell!" when you see my version, but this style is what I had in mind when purchasing the pattern. Ever since I saw Anna's cute collared version, I knew I needed to try one. I'm sure you can see why...


...if only my photos looked as nice as hers. Anyway, you're here to see what mine looks like on me, so here you have it. Note that these photos were taken after I wore the blouse at work all day. Which reminds me, I wore this to work already! It seems like, so often, I end up sewing things and then not wearing them to work or in my everyday wardrobe, but saving them for weekends or special occasions. I'm not sure why it happens, but I'm trying to stop that, since I have such a casual work dress code and there's really no excuse. I can pretty much wear as fancy or as casual of an outfit as I'd like.


Though I'd thought I was being super meticulous in my collar drafting, the pieces ended up being slightly longer than needed, so there's a little bit of overlap in the back, as you can see. At first this horrified me, but then I grew to like it, and now I think it's cute!


It works well with holding cats, too. We call him Bratman.

I just had to include this one for the crazy hair/eyes...

I definitely like this pattern and would recommend it. In case you haven't heard details from the countless other versions other bloggers have sewn up already, one plus of this pattern is that Tasia has created pattern pieces just for the bias binding/facing used on the arm and neck holes. I love this feature! Another plus? no zippers or closures to install. I hope to sew this blouse up again soon - it's already a very wearable me-made piece in my wardrobe.

The next time I make this top, I think I'll go down a size and might add a little keyhole opening in the front or back to add interest as well as make it easier to get the neck opening over my head. I'm also thinking of incorporating the little cap sleeves from View B, and would likely make the hem for the bottom of the blouse shorter, overall. This pattern definitely has a lot of options for variations.

Have any of you sewn a Pendrell blouse yet? What did you think - did you love it?
Am I the last sewing blogger on earth to make it?


Friday, January 11, 2013

2013 Refashion #1

I've shared my sewing goals for this new year with you guys, and if you recall, one of those goals was to do more refashioning. I'm hoping to get the instant gratification of a quick sewing project, without sewing something from scratch and rushing through the steps because I want it to be done already. You know? I'm always on the lookout for pieces with potential when I'm at the thrift store, and am planning to also do a bit of refashioning of pieces I've sewn but don't seem to wear.

Up first is this spotted silk blouse from Goodwill (and the 1980s) that started out looking like this:

spotted silk, long sleeved, '80s blouse (after I'd already removed a sleeve)


The armholes and baggy sleeves were huge, but the fabric was nice and it was a well-constructed blouse, with french seams and bias-faced neckline and hem. I cut the sleeves off and made the armholes smaller. I should have added some bust darts, but I couldn't quite set them up the way I wanted them to look, so I just skipped 'em. There's some bagginess above the bust now, so I might revisit that later... or just continue to style the shirt with a cardigan.


I also took the sides in a lot, and could have done a little better with the shaping on the sides. Oh well. I'd planned to add some collar/neckline embellishment with black ribbon, or maybe even buy a peter pan collar necklace, as I mentioned in my earlier post, but am going to hold off for now. Here's what the top looks like for now.


I do like the way it turned out - it has a cheerful look and it's pretty comfortable! I styled it with a black necklace and cardigan, which helped tame the brightness of that gold/mustard shade. I'm still considering buying or making some kind of collar, probably black, since that'll look nicer next to my face than more of the mustard. We'll see what I come up with...


Here's to more refashions in 2013!

Sunday, January 6, 2013

The '60s are my Jam.

Remember in my 2012 reflections post when I mentioned that one of the things I've learned over the past year is that even though I've loved 1950s fashion my entire life, I've found that 1960s styles are more my thing when it comes to making and wearing 'em? Well, yeah.

Recently, I've been infusing my wardrobe with even more sixties style (and working on my "wear more everyday dresses/skirts" goal). Over my little Christmas break, I snapped up a bright purple, all-season shift on sale on Etsy, and just this weekend I bought two more dresses while on an antiquing extravaganza in Frederick, MD. Check 'em out!


These dresses are easy enough to wear and not so fancy that they can't be worn for everyday, casual occasions. The linen one with white spots fits great, and the black wool one fits in the shoulders, but might need taking in along the sides for a more flattering shape.


In Frederick, I also picked up these two sewing patterns - a 1950s(?) blouse and a 1940s looking skirt. Just because the '60s are my fave doesn't mean I can't wear other decades, too, you know. Both of these patterns are the un-marked kind that don't have any printing or lines on them, only hole-punches in the shape of numbers to let you know which piece is which. Scary. I hope I don't chicken out and can actually make myself use them!


I didn't realize just how good I was being already, until typing this up now. I'm also in the midst of a refashioning project, too. Just chipping away at my "do more refashions" goal! Here's a peek.


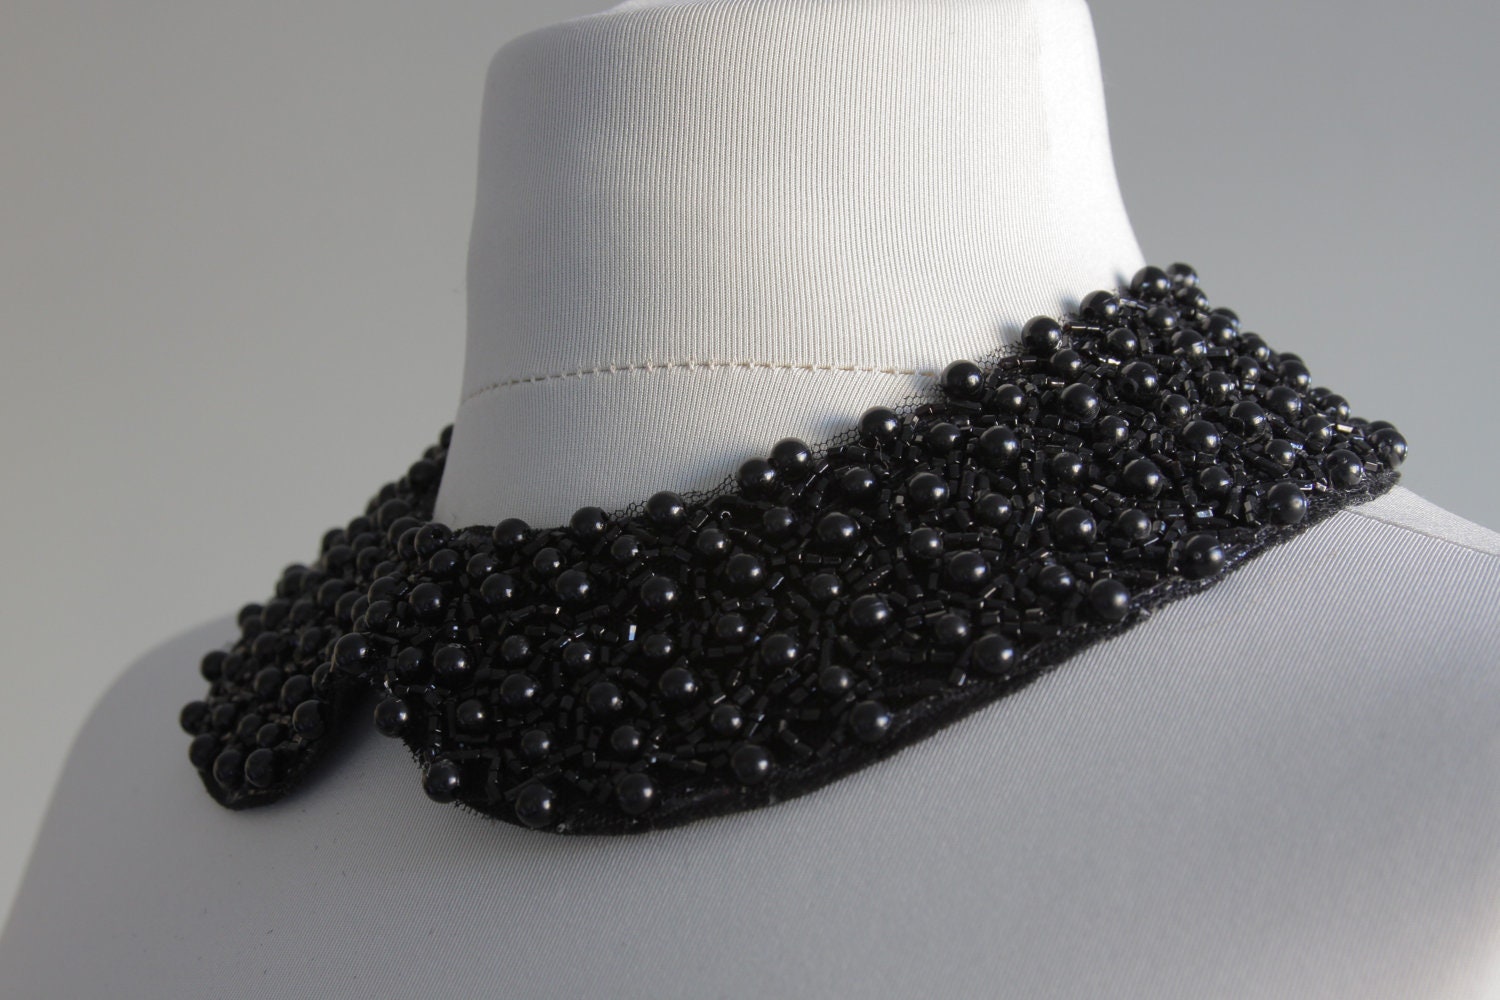
I'd thought I would be using this black velvet ribbon to do some kind of embellishment or collar detail, but the stuff is too stiff to really work in this situation. Now I'm thinking I might make (or buy on Etsy?) some sort of embellished, detatchable black peter pan collar necklace thingy. I don't have any particularly rich black fabric in my stash to match with this spotted silk and I really don't want to buy any more FABRIC, since I'm already drowning in it.


Beaded Collar Necklace from SoStyle


I do like this collar found on Etsy. Any thoughts - make one? buy one? do something else entirely? I'm all ears.


Thursday, November 29, 2012

What next?

Are you doing or planning to do any holiday gift-making/sewing? I don't currently have plans to be sewing up any festive dresses for holiday celebrations yet this year, but I do plan to do little bit of secret gift-making, which means you won't be seeing any of it until around January.

Until then, I'm trying to figure out what relatively un-complicated project for myself I should start next. I did some digging through my sewing area last weekend and pulled out these fabrics and patterns - some new-ish, some not so new.


If I make the blouse, I think I'd opt for version D - all 1 fabric, no pin-tucks or ruffles, and actually omit the sleeves, for easier layering. I have no idea if I'll use that cute Liberty lawn for it at this point, but I threw it in the picture for kicks.

The dress is one I've been wanting to make in some sort of cozy fabric, the collared version in particular. I just recently saw Nina's adorable version made up in a pretty wool crepe and I know Nicole Needles has made one too (I just can't seem to find it right now). I've got this red/white hounds-tooth flannel, which would definitely be soft and cozy, but could also be a little bit odd. Have you ever sewn a flannel dress? Or flannel ...anything other than pajamas?

I'll probably just see where inspiration takes me and end up making a split-second decision right before I grab everything and start cutting (sounds wise, no?) -- but I'd love to hear what you all think, too. I'm a little bit afraid to plan anything out too much, because I've found I sometimes start to lose interest if everything is all pre-set when I start something new.

Saturday, November 17, 2012

It's a Bird... it's a Plane...!

IT'S A PETER PAN COLLAR! (not a UFO)


What! A new make with my favorite collar type, ever!

For this top, I used an animal print grey/black double-knit from my stash, that I think I'd originally bought months ago because I'm afraid of jersey and other slinky, stretchy knits, but wanted to make a Renfrew. Well, this isn't a Renfrew (double-knit would probably not be a good choice for that anyway), but it is a casual top and was my first time sewing with double-knit as well as making raglan sleeves.


I made it from this cute vintage McCalls pattern, using View B. These tops have that 1960s boxy-sack shape going on, which is super comfortable, but not always super flattering when un-tucked (especially when your hair doesn't look as cute as these girls' in the illustration, to balance out the look).

Anyway, the sleeves were great to sew and I'm already planning another raglan-sleeved project. The stretch of the double-knit helped work out any fitting issues and I pretty much just sewed it like a regular woven fabric.


Another thing, other than the raglan sleeves and peter pan collar, that I liked about this pattern (in theory) is that there are no zippers or buttonholes, just a little peek-a-boo closure at the back neck. The only thing I didn't like about the reality of this particular closure, is that the pattern has you make it like 17 inches (exaggerating) long, which is a bit excessive! I couldn't tell quite how big it really was going to be until I'd finished sewing, at which point I made a "harrumph" noise and threw a safety pin in there around the half-way mark in the opening.  I got even a bit more MacGuiver on this baby when I then used a chopped up HAIR ELASTIC for my little button loop, because I didn't have anything better. It actually turned out pretty okay.


The little sparkly button is just a lonely one from my button jar that had lost its mates. It was definitely fun to pour out my entire jar of buttons and sift through it looking for the perfect one - hadn't done that in a while.

Something else I hadn't done in a while? MENDING. Blerg. This weekend, though, I was a good girlfriend who mended her guy's favorite cardigan that had been sitting in the mending pile for EVER, and then even altered one of his dress shirts (pats self on back) by adding a couple of long back darts. That may make you think I have some sort of tailoring skillz, but we'd actually just been at the real tailor earlier in the day to pick up another of his shirts in the exact same size and cut, so I was able to basically copy what they'd done there.  Shhh, don't tell the tailor.

Also, I've just started reading this:


I'm probably the last sewing blogger in blog-land to read this, but better late than never, eh? I'm only on Chapter 2 so far, but it's already really interesting. Leah of Struggle Sews a Straight Seam did a nice write-up of her thoughts after reading it, which I enjoyed reading (and you might, too).

One thing I'm already appreciating about the book is that Elizabeth Cline, the author, cites the research of the author of Service and Style, which I read a little while ago. I looooved learning about the history of department stores in America. It really made me wish (even more) that I lived a few decades ago instead of now.

Anyway, that's enough nerding-out for now. I'll be back soon with more details on my next project, and maybe even an upcoming giveaway.

Thursday, May 17, 2012

Life update

Well, people, it's happening -- I'm starting a new job at the end of the month!
What? You didn't know I'd been looking for one? Oh. Well...

This opportunity just kind of came out of nowhere and seemed like the kick I've needed to start pointing my career in a more creative direction. I'll be saying goodbye to the training company where I've worked as an editor/admin. on an (awesome!) curriculum development team for the past 2 and a half(ish) years. ...and saying HELLO! to something totally different. It was a tough decision to make, since I'm still trying to figure out what to do with my life, career-wise, and I've really bonded with and will miss my coworkers, but I'm excited to take this leap.

My new position is at a custom t-shirt company where I'll be working with customers via phone/email to proof and review their custom designs and help resolve any issues that may arise before their orders reach the Production Artists. I'll be learning a little bit about Adobe Illustrator, and maybe Photoshop, which is super exciting to me. Though it's not the most artistic role I can imagine, I really can't even express how thrilled I am to be joining a fun, design-oriented company.

Anyway, enough gushing...for now.

"Any other updates?" you ask.
Well, yes.
I've managed to finally switch out my spring/summer clothes from the boxes they've been hibernating in and shove everything into my closet. There was actually just enough room for them since I also weeded out all of the "useful" but un-loved office-appropriate pieces in there that were really just taking up space and detracting from my overall happiness (hah!). At my new job, I'll be able to dress very casually if I want, so I can chuck out all of the ill-fitting pencil skirts and secretly ugly tops I've collected over the years. Ahhh, what a relief.

non-ugly, vintage springy top, recently freed from storage

While doing my wardrobe rearranging, I dug out this cute little eyelet blouse I bought about a year ago (I think? ...how quickly vacations blur into the all-encompassing Past) when Tom and I visited Napa, CA. We stayed in a b&b in downtown Napa, and, between trips to nearby vineyards, we explored the town a bit and found Wildcat Vintage, a great little shop that sells both authentic and reproduction vintage clothing and accessories. I'm fairly certain I chatted the poor shop owner's ear off whilst trying on nearly everything in sight, but she was very tolerant of my feverish, crazy-person behavior, even though the store was about to close for the day.


little peter pan collar

The combination of a peter pan collar, sweet white eyelet, and the little pleated peplum-like detail at the waist, was irresistible to me. It's a top that just begs for a high-waisted skirt, or cropped pants/shorts to pair it with. I don't know its exact origin, but I'm guessing it's from the early 1960s...?


pleated peplum

Looking at this blouse for the first time in a while has really got me wanting to sew a top or something out of eyelet! (which I have yet to try) One thing I noticed construction-wise, which may seem obvious to you but wasn't to me, is that the under-collar appears to be white organza, rather than the usual fashion fabric + interfacing combination I've seen prescribed in collared blouse patterns -- I suppose most patterns aren't created specifically for sewing with eyelet or otherwise sheer fabric.


difficult to photograph, organza under-collar

I'm looking forward to wearing this with my Ginger skirt and any other high-waisted pieces I can come up with.

Hopefully, I'll have some dressmaking progress to share with y'all soon, though I do have another busy weekend coming up and haven't found time to sew much of anything lately. Blerg.


Sunday, February 26, 2012

Finished project: Violet

When I found out about Julia Bobbin's Mad Men challenge (bonus: she's currently hosting a giveaway for some amazing deep purple silk peau de soie!), I pretty much dropped everything and obsessed over what character's dress to use as my inspiration, blah blah blah. But, then I started to feel guilty for abandoning my already cut-out Violet blouse, so, once I'd squared away my Mad Men inspiration, pattern, fabric, etc., I decided to finish up Violet. I don't think I've officially announced this, but one of my goals for the year is to produce a minimum of one piece a month - my "Good Intentions" dress was January, Violet will take care of this month, and my Mad Men dress will be March. Yay for goals!
Here she is! (Still struggling with photo lighting, but had some help from filmmaker boyfriend.)
So, if you remember, I was a little bit intimidated by some of the elements of this blouse - mainly the 7 buttonholes. In addition to the buttonholes lined up down the front of the blouse, the collar, puff sleeves, and yoke were actually all firsts for me. Oh, and working with this type of fabric - Swiss dot. All in all, this blouse was easy to sew up and the instructions were clear and simple to follow (thank you Colette Patterns!). Where I struggled was really with aspects of the project that were...well, more my fault.

Fabric choice, for instance. The Swiss dot fabric was annoying to work with. It frayed a lot, everywhere, and as soon as I'd carefully hand-tacked the back neck facing to the back of the shirt, to keep it from flipping up, the stitches tore through the thin fabric. Also, it's pretty sheer, and, being used/vintage, happens to have some areas of slight discoloration that I only noticed once I'd started sewing. Boo.

When I did start to sew, I'd thought I was being such a smarty pants by changing to the smaller needle recommended by my machine manual for such lightweight fabric, but still found that any stitches I made and removed left rather visible holes in the fabric, especially in portions that were not underlined (like the sleeves and back yoke). That's right, I did underline most of the thing, to cut down on the see-through factor, which also helped bulk up the finished blouse a bit (in a good way). Without underlining, this baby would have been a sheer, wispy sack, if you ask me. 
Tucked into a vintage green wool skirt I never seem to have anything to wear with.  (The corner of my sewing area seemed to have the best lighting.)
I also struggled a bit with getting the blue chalk marks off of the fabric once I'd sewn up the pieces, especially on the darts. Amateur issue, I'm sure.  Did I mention this fabric is see-through? Anyone have a recommendation/secret for getting chalk out of sheer (or any) fabrics? I tried some water after brushing the marks off didn't work, but to no avail. Maybe I should have used some other type of marking tool?

The dreaded buttonholes proved to be another issue. At first, I was pleasantly surprised that I was able to better control where my machine stitched the holes, compared to buttonholes I've tried in the past (maybe I'm getting better?), but I still made some mistakes with how I'd marked them and ended up having to rip out two whole buttonholes and re-do 'em. Then, also due to my poor marking skillz, I managed to attach the bottom three buttons onto the placket just ever-so-slightly unevenly, so they don't quite match up with the buttonholes. This resulted in some bunchyness once I buttoned the blouse. Whatever, though, this is something I can go back and adjust later.

And my big mistake? I wasn't paying attention and sewed the buttonholes on the left side of the shirt, instead of the right, like a guys' shirt. Meh. :-/

Giggling at the cute cameraman. (Ack, I need a haircut!)
Lastly, the collar. I do love a peter pan collar. In a perfect world, though, this collar would lie flatter, but I can live with it, or try to fiddle with it later. I think there may be an issue with the fit of the neckline which causes the collar area to gap in the front a bit, in addition to just not wanting to lie flat. Maybe next time I'll try cutting a smaller size? Also, I wish I'd been able to make the shape of the collar more even, but that'll just have to wait until next time, too.

Despite all of my issues and complaining, :) I think I'd definitely sew this pattern up again - just maybe not with such thin, sheer fabric. I know some sewists out there in blogland mentioned that they found the Violet to be a bit too boxy on them, but I like the loose fit. It's comfortable (I don't have to suck in my gut, yay!) and makes it easy to tuck the top into a skirt or something. It does make for a more casual look, though.

If you're thinking of trying out Colette Patterns' Violet, here are a couple of my favorites I've noticed around the internets. (There's also a flickr group with about a million beautiful examples) Check 'em out and get inspired!