Showing posts with label Summer. Show all posts

Friday, August 31, 2012

Warmer Weather Wardrobe Revisit

At the beginning of spring this year, I put together a Warmer Weather Wardrobe sewing plan. Now that spring is over, summer is wrapping up, and fall is rapidly approaching, I thought I'd do a little revisit to see how my warmer weather sewing panned out.

First off, I specifically noted in my plan that I was something of a slow sewer, seeming to take about a month to sew anything, regardless of the size or complexity of the project. I'd wanted to take this into account when trying to form a realistic sewing plan. I think I can now say that my sewing has gotten a little speedier, though nothing to brag about. I've just gotten some more experience under my belt, which always helps things go faster.

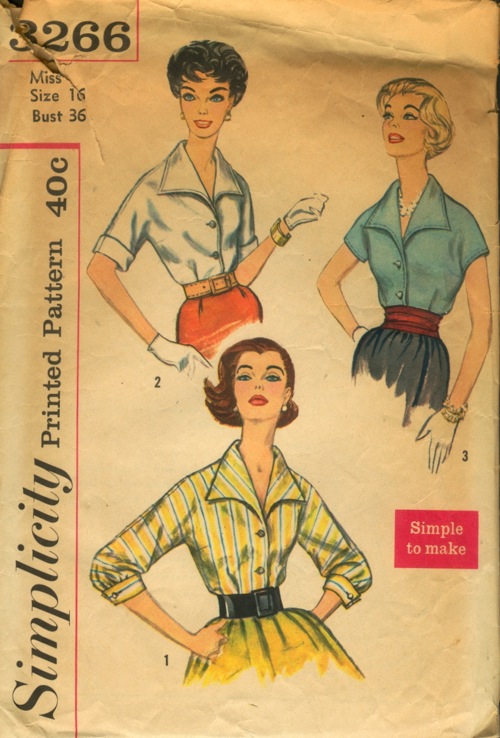
Anyway, my plan had me really trying to work from stuff I already had in my sewing room to meet my warmer weather wardrobe needs. The first thing I made was my vintage Simplicity 3266 blouse. This was my first foray into sewing with vintage patterns and I got to use some cute fabric I already had.


Simplicity 3266


I love the idea of this blouse, but it just hasn't been something I end up wearing. It's one of those tops that seems to demand to be tucked in, but even when I do, it still seems blousy and poufy and unflattering. I planned to remake it with a more subdued collar shape and slightly narrower sleeves to see if I could make it work, but have yet to actually do so. 

I also had grand plans for a Ginger skirt made up in denim, after being inspired by the numerous cute versions floating around out there on the internet. I wanted to perfect the fit before cutting into denim, so I made it first in dark blue broadcloth I'd had in my stash. 


Colette Patterns' Ginger


I like the way this one turned out, though I will make some tweaks to the waistband for my next version, but I still haven't gotten around to sewing it up in denim, or any other version for that matter! Luckily this first version does get some wear in my summer wardrobe, and will hopefully continue to do so, at least for the beginning of fall.

The two more exciting pieces on my sewing list were wedding guest dresses. I sewed them up from patterns that were already in my stash and most of the fabric was stuff I'd already had, as well. Even though these are party dresses, I think they might be the most wearable (or maybe just the most fun to wear) pieces I created from my spring/summer sewing plans. 


The Milly Wedding Guest Dress - New Look 6910 (modified a lot)

Polka Dot Wedding Guest Dress - McCall 5845 bodice (modified) + a circle skirt


And that's it! The above projects were all pieces that came directly from my warmer weather sewing plan. But that doesn't mean that's all I made to add to my spring and summer wardrobe. Sometimes you can't always just stick to the plan - you have to go where inspiration takes you! These pieces were created as quick, fun projects that were not really planned out at all. I find that these types often end up being my favorites.


My Estate Sale Dress made from McCall 9735


This cute blouse, that I still haven't completely finished (oops!), made from McCall 9458. I LOVE the fabric, though, so hopefully I'll be making this baby wearable soon.


My latest project, the bow blouse from Simplicity 2154, using the spotted rayon shirting I'd originally planned to use for a Sencha blouse (a pattern that's STILL on my to-sew list).

What was on my warmer weather sewing plan that didn't end up getting done? 

Well, for one, this pretty rayon challis is still sitting in my fabric stash. I love it but just haven't found the perfect project to use it for yet. Hopefully I will soon!


abstract floral rayon challis


Same thing goes for the pencil skirt that has been on my to-sew list for longer than I can remember. I keep telling myself I'll get a pattern perfected and then make a zillion versions, but haven't actually done so yet. Now that my dress code at my new job is very casual, I'm not sure if I'll even need many pencil skirts...though I do love them.

That's all for my little recap. In other news, I actually managed to sew Tom's birthday shirt up in time to give it to him as a gift, but I'm going to need to do some adjustments to it before I can post about it here. It's currently too big (surprise, surprise - thanks for all the extra ease, McCalls). Since he wasn't around while I was sewing it, and it was kind of a surprise, I wasn't able to fit it to him as I sewed, so I knew this would happen. Anyway, I'll share more details once I get it officially completed. :)

Monday, August 6, 2012

Finished Project: The Wedding Guest Dress

Annnd, we're back!

I've returned from my time off vacationing and participating in friends' wedding festivities. The past week or two has been a bit of a whirlwind  - and now it's AUGUST! What? Where did half of summer go?!

Anyway, as promised, I've got all the juicy details on my latest finished project. Just for the record, I did complete this dress in July, so it still counts toward my one-finished-project-a-month goal - yay!

On the pretty patio at the wedding with Tom.

Dressmaking Details:
  • On the bodice, I lowered the front neckline by 1.5" 

front

  • Added 2" to the back of the bodice to help hide my bra, but then somehow ended up liking the final look better without one!
     
  • I made all of the darts inside, instead of outside as the bodice design prescribes.


back


  • I lined the bodice with muslin and half-assed some bias facing to finish the armholes, since I didn't construct the bodice as I should have in order to properly incorporate the lining (like this). Maybe next time I'll do it right!
  • Ended up just making a small hem for the circle skirt without too much trouble. It isn't perfect, but looks ok to me. 


circle skirt hem and sad (but functional) armhole finish

  • Tried French seams for the first time on the unlined skirt. 
  • I'd wanted to do something interesting in the back since the design of the dress is fairly simple, so I created a tiny key-hole thing with a bow clasp.  

    I used a sturdy clasp and some small snaps to secure the back bow. Note: photos were taken after wearing (and sweating!) in the dress all evening!


  • Didn't actually follow any instructions when constructing the dress, other than the waist-stay tutorial. It was fun to kind of just "make it work" as I went along - even though it didn't result in the most perfectly finished garment.


Waist stay details - sorry for the wrinkles!


Outfit Details:
  • As for my hair, I just put it up in a bun and pinned back my "bangs" (they're almost too long to be called that) in a little swirl.

hair!

 
  • Opted to pair the dress with a thrifted red belt, rather than making one - much easier!
  • Wore with a pair of white wedges and a vintage straw/woven purse. 


vintage(?) straw purse
    • I got the purse at an antique store in Napa, CA a year or two ago when Tom and I were vacationing there. I have no idea what year or decade it's from, though I did notice a tiny "Made in China" tag inside, if that's any indication of its age. I love wearing it because it's just big enough to hold my phone, camera, wallet, and sunglasses and doesn't weigh a ton.


Results of Wear:
  • Let's just say that sitting in the hot sun in 90+ degree weather during the ceremony had me doing *some* sweating, which ended up causing several of the red spots on the fabric to BLEED. I should have seen this coming, since there was a little bit of slight bleeding/running of red-ish dye when I originally washed the fabric prior to starting the project. 


bleeding dots :-/

 
  • Also, the skirt is now totally wrinkled and creased in a million places - oh well!
  • The back bow kept coming unsnapped whenever I moved, but that wasn't a serious problem, since the clasp stayed firmly closed (keeping the dress from falling off!). It just resulted in one side of the bow flopping around a little bit while unsnapped.


slightly crooked back closeup!

 
  •  The back did get a little scrunchy/slouchy at times as you can kind of see in the photos.
  • The waist stay started to feel a bit constricting by the end of the night. I definitely unclasped it for the car ride home!

All in all the dress was a hit and I'm pleased with the final result. It was my first go at making a circle skirt, a waist stay, and improvising the back bodice closure the way I did. :)

Yay dress! and Congrats to Mike and Alison! (and yay, food! The salad I've clearly demolished in this photo had edible FLOWERS in it!)


Saturday, July 28, 2012

Bon Voyage!

Just checking in before I leave for a week of fun and sun and frolicking on the beach...
in my new swimsuit that I got for my birthday!


Check out that anchor - love it! The more nautical, the better, I say. This swimsuit is a little different for me with its open back and low front because most of my suits are one piece, Esther Williams style maillots and don't show as much skin. I'm excited about this new one because it's kind of somewhere in between wearing a one-piece and a bikini.

Now, I obviously didn't sew that swimsuit (maybe I'll get there someday...), but I did finish sewing my polka-dotted wedding guest dress! I'll have the full post with more details soon, but here's a sneak peek of what it looked like while I was putting on the final touches.


Oh, and don't worry you guys - I've got some fun posts scheduled for this next week while I'm at the beach, so stay tuned!

Tuesday, May 29, 2012

Finished Project: Gathered Skirt (and a little road trip)

Over the long Memorial Day weekend, Tom and I made a quick trip to Charlottesville, VA. It's such a beautiful area and is a town we've been wanting to explore more. The night before we left, I whipped up this basic gathered skirt using Gertie's tutorial and some brown cottony fabric from the estate sale I went to last month. This make was quick and simple and I didn't do a single stitch of hand sewing - couldn't be bothered. It ended up being the perfect thing to wear in the hot, muggy weather we had.

top: Target; belt: thrifted; skirt: me-made, with Gertie's tutorial; shoes: Target.

Luckily for me, my measurements matched up with those Gertie used in her tutorial, so I didn't even have to do any math to whip this baby up. A quick project like this was just what I needed. I didn't need to be a slave to an instruction booklet and was able to just kind of wing it after glancing at Gertie's tutorial. As I said, I didn't do any hand sewing for this skirt, even though Gertie recommended it for attaching the inside of the waistband and sewing the hem. I didn't have the time or the energy for that, and on such a casual skirt, I don't think it really matters - at least not to me!


If you look closely in either of these pictures you can see that not only did I blatantly machine stitch the hem, but I even used black thread. I don't have any brown! Such a rebel.


machine-stitched hem

My main goals for this project were to:
1) have something cute/comfortable to wear on my trip, and
2) to practice making a full gathered skirt, which I was surprised to realize I'd never done before.
Mission accomplished, I'd say. I'm planning to use this same technique - recommended by Gertie - of using a zig-zag stitch over a strand of cord/thicker thread to make the gathering stitch, rather than the 3 rows of basting I've heard about before, for my spotted pink/black wedding guest dress. I've actually made a little bit of progress on that front, which I'll share soon.

While in C'ville, we got to act like tourists and walked all over the place checking out cute little shops and restaurants. I found one shop called Vintage Vixen (sound familiar? - how many sites/blogs/stores have a combination of those two words in their name!) and rushed inside...only to find expensive, designer clothes, largely from the 70s and 80s, though a few were from the 60s and a couple from the 50s. There were a couple of items to my taste, but not in my price range (I'm pretty cheap).

Much of our little visit in Charlottesville revolved around food. We made a mandatory stop at Cook-Out, Tom's favorite fast food restaurant of all time, and grabbed some cheddar style burgers and a peach cobbler shake. Later in the day we found ourselves at The Whiskey Jar at the outdoor downtown mall, which was a rather unique and delicious experience. I sipped some moonshine punch, munched on some complimentary fresh, homemade pickles(!), and debated ordering some fried chicken and collards (but ultimately passed - it was just too hot out to stuff my face with more food).

Sitting outside at The Whiskey Jar; moonshine punch; Cook-Out feast

For dinner we ended up driving out to the famous Crozet Pizza. The drive was scenic and we got to see lots of pretty farmland and some mountain views. The restaurant was essentially unchanged since being built 30ish years ago, and had a great atmosphere. There were brown-with-age business cards pinned to the walls by past customers and a well-worn patina on every surface in sight. AND the pizza was just as delicious as expected.

It was a quick, one-night trip, and on our drive back up to Northern Virginia the next day, we stopped at an antique mall where Tom sneakily bought this for me and hid it in my bag without me even noticing. 

The New Encyclopedia of Modern Sewing - 1949

I love all of the little illustrations


It's chock full of helpful advice and cute illustrations. There are also some outfit photos...which were difficult to capture via camera, so you'll just have to take my word for it.


Chapter 2. Sew a Straight Seam
All in all, I'd say it was a pretty good weekend. I successfully whipped up a quick sewing project, ate some (meaning a LOT of) tasty food, and even managed to bring home a vintage sewing book. Hooray!

P.S. as you read this, I'll be at my first day of the new job, so send me some good-luck thoughts!

Thursday, May 17, 2012

Life update

Well, people, it's happening -- I'm starting a new job at the end of the month!
What? You didn't know I'd been looking for one? Oh. Well...

This opportunity just kind of came out of nowhere and seemed like the kick I've needed to start pointing my career in a more creative direction. I'll be saying goodbye to the training company where I've worked as an editor/admin. on an (awesome!) curriculum development team for the past 2 and a half(ish) years. ...and saying HELLO! to something totally different. It was a tough decision to make, since I'm still trying to figure out what to do with my life, career-wise, and I've really bonded with and will miss my coworkers, but I'm excited to take this leap.

My new position is at a custom t-shirt company where I'll be working with customers via phone/email to proof and review their custom designs and help resolve any issues that may arise before their orders reach the Production Artists. I'll be learning a little bit about Adobe Illustrator, and maybe Photoshop, which is super exciting to me. Though it's not the most artistic role I can imagine, I really can't even express how thrilled I am to be joining a fun, design-oriented company.

Anyway, enough gushing...for now.

"Any other updates?" you ask.
Well, yes.
I've managed to finally switch out my spring/summer clothes from the boxes they've been hibernating in and shove everything into my closet. There was actually just enough room for them since I also weeded out all of the "useful" but un-loved office-appropriate pieces in there that were really just taking up space and detracting from my overall happiness (hah!). At my new job, I'll be able to dress very casually if I want, so I can chuck out all of the ill-fitting pencil skirts and secretly ugly tops I've collected over the years. Ahhh, what a relief.

non-ugly, vintage springy top, recently freed from storage

While doing my wardrobe rearranging, I dug out this cute little eyelet blouse I bought about a year ago (I think? ...how quickly vacations blur into the all-encompassing Past) when Tom and I visited Napa, CA. We stayed in a b&b in downtown Napa, and, between trips to nearby vineyards, we explored the town a bit and found Wildcat Vintage, a great little shop that sells both authentic and reproduction vintage clothing and accessories. I'm fairly certain I chatted the poor shop owner's ear off whilst trying on nearly everything in sight, but she was very tolerant of my feverish, crazy-person behavior, even though the store was about to close for the day.


little peter pan collar

The combination of a peter pan collar, sweet white eyelet, and the little pleated peplum-like detail at the waist, was irresistible to me. It's a top that just begs for a high-waisted skirt, or cropped pants/shorts to pair it with. I don't know its exact origin, but I'm guessing it's from the early 1960s...?


pleated peplum

Looking at this blouse for the first time in a while has really got me wanting to sew a top or something out of eyelet! (which I have yet to try) One thing I noticed construction-wise, which may seem obvious to you but wasn't to me, is that the under-collar appears to be white organza, rather than the usual fashion fabric + interfacing combination I've seen prescribed in collared blouse patterns -- I suppose most patterns aren't created specifically for sewing with eyelet or otherwise sheer fabric.


difficult to photograph, organza under-collar

I'm looking forward to wearing this with my Ginger skirt and any other high-waisted pieces I can come up with.

Hopefully, I'll have some dressmaking progress to share with y'all soon, though I do have another busy weekend coming up and haven't found time to sew much of anything lately. Blerg.


Friday, May 4, 2012

Summer weddings dress plans

Friends, I have a confession. I'm sorry to say that I sort of disregarded your votes for my wedding guest dress plans. Well, not completely, but...
(Also, I've taken on Kate Gosselin's style of discussing a topic here a little bit, the self interview. Just a heads up.)

I've decided to at least try to make two dresses since I'll be attending two weddings this summer - in early August, actually. And the two patterns I chose from the four I'd had you vote on are:

McCall 4581 and New Look 6910!!!!!!

1958 McCall 4581
New Look 6910 - yes, this photo isn't the highest quality, but is that Sarah Palin??

Yaaaaayyy!

What?

Next to no one voted for New Look 6910?

That's the part I "disregarded" ...because I want to make it! It's similar to the other NL pattern I'd thrown in the ring for voting, but I like the scoop neckline + princess seams combo. What don't I like? That jacket. I'm pretty sure that's why this baby got very few votes from y'all too. Don't judge a book by it's cover! Or a dress by it's heinous shiny chartreuse jacket! It's what's inside [the jacket] that counts. Ok?

I'm planning to go with a combination of options A and B. I'm thinking full skirt, scoop neck, little sleeves (which I might lengthen a bit). Why would I want sleeves if these weddings are in hot, humid, muggy, gross August? I think it looks better...and maybe they'll help catch the sweat that will be pouring off of me. Oh, and I'm ignoring the little waist detail/belt-y things going on in this pattern -- a bow belt thing might be cute, depending on my fabric choice, but we'll see.
NL 6910 fronts

NL 6910 back

And for fabric choices, I was initially thinking I could use the blue/green rayon challis I'd hoped to make use of in my warmer weather wardrobe plans since it would be nice and breathable and soft and twirly, but now I'm really being drawn to the pink/cream/black color scheme of the fabric (maybe it looks better in person?) I picked up with my livingsocial deal for G. Street Fabrics. I'm kind of torn between the two - they'd create such different looks. If I picked the green/blue rayon, I think I'd want a contrasting belt of some sort to break it up a bit, since it's an allover print...but if I went with the pink/cream/black, I could use the pink pima sateen for the bodice and the Milly spotted (slightly stiff) silk for the skirt. What do you guys think?

blue/green rayon challis abstract floral
rayon closeup

OR:

pink pima cotton sateen (matches the pink of the dots on the silk below)

Milly spotted silk - pink/cream/black

As for the vintage McCall's pattern, (the illustration for which also lives in my blog header, in case you  missed that) I think I'm all decided re: pattern + fabric. It was kind of a given for me - I couldn't not choose it! Gillian called me out in the comments on my last post before I could even announce my plans...to use white & red fabric! I'll basically be making the dress on the envelope - full, not pencil skirt - with this fabric I'd originally planned to use for a Sencha, but couldn't resist matching up with this dress (after hurrying online to buy extra yardage). It's a kind-of-drapey white rayon shirting with red spots. I was thinking I could finally use my belt kit I got from Sunni's shop over at A Fashionable Stitch to make a coordinating red belt, too...or maybe matching polka dot...?

spotted rayon
As you can see, the skirt I'll be working with here is rather full - that's a lot of fabric!
I've never made a circle skirt, so have nothing to compare it to, but I'm hoping to doing lots of twirling. Such a full skirt makes me wonder if I should try to wear my light pink vintage (very similar to this, but closer to tea length, which is not really my optimal length) crinoline under it, or make a new, smaller crinoline (like Gertie's), OR try Gertie's other full skirt flouncyness solution of lining it with organza for a slight, built-in poof.

instructions illustration
back of pattern envelope

Well, what do you think? Am I on the right track here?

I've actually got three weddings I'll be attending, but the first one is this weekend, so I didn't have the forethought time to sew something up. I did however pick up a simple teal sheath dress from Goodwill that I plan to alter (at the last minute) a tiny bit so I can wear it to this derby day/cinco de mayo/wedding. Planning to go for a teal + red color combo, but I'll share more all about that once I've got photos and such.

Have a great weekend, everyone!

Tuesday, May 1, 2012

Finished Project: Estate Sale Dress

This project kind of popped up out of nowhere. It doesn't really relate to my warmer weather wardrobe plans, but sometimes you've just gotta go where inspiration takes you.

I started it on an impulse, did not plan it to death, and am finding myself rather pleased with the results. As Gillian noted recently, quick, impulsive creating sometimes pans out well and other times it falls flat. In this case, I think it worked in my favor. Not planning this project out too much helped me enjoy the sewing process on this simply constructed dress, kept me from stressing about working with plaid for the first time, and boosted my morale a bit, too.

McCall 9735 - view C


I used the plaid fabric, some navy bias tape, and McCall 9735 all from my recent estate sale haul. Now, I technically made this dress in April (with my Ginger and my Easter Egg blouse, that makes 3 finished pieces for the month...yay!), even though I'm debuting it in May.


Here she is! (the collar looks rather uneven in this photo, but I promise it's just an illusion.

Let's get down to some details about this dress, shall we?

I opted for version C -- SLEEVELESS! (I'm still pretty much over set-in sleeves) I think this will make it a good casual summer dress that can easily be paired with one of my ever-present cardigans. Now, speaking of the sleevelessness of this baby, at the last minute I decided to use bias tape to finish the armholes instead of just as armhole facing.  I'd even cut out the actual armhole facings with the pattern pieces, but now they're hanging out in my scrap basket - oh, well. The way I did the bias tape kind of extended the edge of the armhole over onto the shoulder a bit, so they're verging on cap sleeves of sorts, which I actually like.

I did end up using the neck facing pieces, but not as facings! I combined the front and back pieces to create a little collar and faced the inner neckline with more bias tape.


Bias tape bound armholes.

Collar!

As soon as I'd decided to make this pattern, I knew I wanted a belt involved, or else I'd just feel like a frumpy, plaid blob. Instead of opting for the exact belt option in the pattern, complete with buckle and eyelets, I just used a strip of fabric to make a little sash/tie. This helped eliminate the baggy tent-like aspect the pattern design, sans belt, had going on.


From the back - the belt/waist tie definitely helps give this dress some shape.


I was inspired by the soft, lightweight, linen-y feel of the plaid and wanted a casual warm weather dress (I haven't switched out my winter wardrobe, since the weather here has been all over the place. All my spring/summer clothes are still hiding in a bin). I love how comfortable this dress is. Part of that is due to the loose fit, though I'm considering making a couple of darts/tucks in the front bodice near the waist to keep it from looking super blousey on top - at the same time, though, I don't really care! like it anyway.


Might eliminate some extra bulk in bodice with more darts or tucks.

Now, about working with plaid...matching up the stripes in this project wasn't totally horrible, but I'd still call it a fail, mainly because I just couldn't really be bothered to care. If I'd been really trying, I'd say I did my best, but...I didn't. I did work to at least acknowledge the placement of stripes when I was aligning the pattern pieces on the fabric before cutting, but I didn't match anything along the seams. The bust darts plus the long french(?) darts combined to kind of make plaid-matching impossible, or at least not worth it for me. I came close, but then failed at matching the plaids at the center back zip, but, like I said, I'm not sweating it! I've noticed it's not terribly uncommon for inexpensive RTW garments to not bother with matching plaids and prints at seams, so for this quick project, I don't mind and don't expect to get any weird looks when parading around in my somewhat miss-matched plaid creation - or at least not due to my lack of matching stripes.

Is it even possible to match plaids on side seams of an A-line skirt??


Also of note for this project, I was finally able to install an invisible zipper with my regular zipper foot and not have it look totally bunchy, blatant/un-invisible, and gross! yay.

I promise I'll do an official fashion show with this dress and my Ginger(s) - I'm hoping to have a denim one in the works very soon - once I can get some photos of me actually wearing them.

Also, up next, I'm going to be picking one or two of these dress patterns from my stash to make so I can have a pretty new dress (or dresses!) to wear to the two back-to-back weddings I'll be attending this summer. What do you think? I've numbered them one through four, so feel free to vote on which one or two you think I should make!


As always, please excuse the crappy photo! Bonus points to anyone who recognizes the vintage McCall pattern. :)