Showing posts with label collar drafting. Show all posts

Sunday, September 29, 2013

Peter Pan Pendrell Replacement

My original Peter Pan Pendrell


Back in January, I was inspired by a peter pan collared Pendrell blouse made by Anna of Paunnet. I ended up making my own peter pan Pendrell, in teal rayon challis and loved it. I loved it so much, in fact, that I wore it and washed it a few too many times and it started to fall apart in any little place I'd not finished the seams 100% perfectly. I just recently parted ways with it (which felt weird, donating a me-made) and decided to make a replacement. I had just enough of the teal rayon left over to whip up a Laurel version, to fill the gap the Pendrell had left in my closet (and life).


I used the same collar as what I'd drafted for my pink Laurel top and simply rounded the pointed corners in the front to get the look I wanted. I used French seams throughout, and instead of completely foregoing interfacing in the collar (as I'd done and regretted in the Pendrell version), I used muslin to interface it, which worked pretty well. I also got to make bias tape and grinned the whole time -- for some reason I love this tedious task.


I'm so glad to have this blouse back in my closet and ready to wear! The soft collar for this version makes it easier to layer than my pink collared Laurel (which as been restricted to warm weather wear only).

In writing this post, I've just realized my next project, currently in the works, is also inspired by pieces Anna has made. As soon as I saw her recent post about her pinafore project, I started purchasing patterns and cutting fabric. More on that soon!

Sunday, May 5, 2013

Finished Project: Laurel v. 3

I told you all I was obsessed with the Laurel pattern from Colette Patterns. But I didn't tell you I was planning to make the top version (after having already made my two dress variations). Well, here you have it, my third iteration of the Laurel pattern, a top!


I promise the collar is even, it just wanted to be a little bit stiffer on that one side in this photo!


I used a bubblegum pink, sateen, shirting cotton I'd had in my stash for a while, but was never quite sure what to do with, since I only had 1 yard. I'd used a tiny bit for the collar on my Milly Wedding Guest Dress, but was a bit stumped on what to do with the rest of it. Finally it hit me - a basic top. Duh!

The fabric is such a pretty color, it makes me happy simply looking at it. I knew I didn't want just a plain shirt - the Laurel can be pretty basic - and I also didn't want to bother with setting in any sleeves. I opted for a sleeveless version with a self-drafted collar (you know I love a good collar), using Gertie's tutorial from her book.


One thing I was pleasantly surprised about was the fit. For my Laurel shift dresses, I'd ended up taking in something like an inch on each side seam, but the loose fit of this top works great and I didn't end up needing to make any adjustments at all.

The only thing I'd do a bit differently next time is cut out the top a little longer. I ended up making a whole pile of bias tape for finishing the armholes and neckline (using this basic tutorial, and loving it!) and used the leftover length as facing/finishing for the hem, to save a tiny bit of length on the finished top.

It's a super comfortable (and cheerful!) top to wear, and I've already begun incorporating it into my wardrobe for Me-Made-May. Yay!

Wednesday, January 30, 2013

Finished Project: Teal Pendrell

Ahh, how nice to have a completed project. Even though I felt distracted by all of the sewing inspiration swirling in my head over the weekend, I managed to finish up my Pendrell blouse. Yay!

In keeping with the color scheme of the pattern envelope (oops!), I sewed this baby up in a teal rayon challis from Fabric.com that had been sitting in my fabric stash mountain for a few months, hoping to become a blouse. It's very soft and silky, and feels great to wear. I just love the color, and I've got a little bit of fabric left, so I might try to incorporate some of it into a future project.


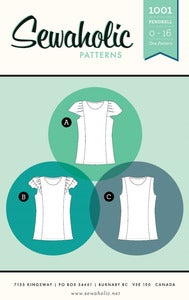
As you can see, I picked the simplest version, View C, and added a peter pan collar, which I drafted using Gertie's instructions from her book. I know you might not think "Pendrell!" when you see my version, but this style is what I had in mind when purchasing the pattern. Ever since I saw Anna's cute collared version, I knew I needed to try one. I'm sure you can see why...


...if only my photos looked as nice as hers. Anyway, you're here to see what mine looks like on me, so here you have it. Note that these photos were taken after I wore the blouse at work all day. Which reminds me, I wore this to work already! It seems like, so often, I end up sewing things and then not wearing them to work or in my everyday wardrobe, but saving them for weekends or special occasions. I'm not sure why it happens, but I'm trying to stop that, since I have such a casual work dress code and there's really no excuse. I can pretty much wear as fancy or as casual of an outfit as I'd like.


Though I'd thought I was being super meticulous in my collar drafting, the pieces ended up being slightly longer than needed, so there's a little bit of overlap in the back, as you can see. At first this horrified me, but then I grew to like it, and now I think it's cute!


It works well with holding cats, too. We call him Bratman.

I just had to include this one for the crazy hair/eyes...

I definitely like this pattern and would recommend it. In case you haven't heard details from the countless other versions other bloggers have sewn up already, one plus of this pattern is that Tasia has created pattern pieces just for the bias binding/facing used on the arm and neck holes. I love this feature! Another plus? no zippers or closures to install. I hope to sew this blouse up again soon - it's already a very wearable me-made piece in my wardrobe.

The next time I make this top, I think I'll go down a size and might add a little keyhole opening in the front or back to add interest as well as make it easier to get the neck opening over my head. I'm also thinking of incorporating the little cap sleeves from View B, and would likely make the hem for the bottom of the blouse shorter, overall. This pattern definitely has a lot of options for variations.

Have any of you sewn a Pendrell blouse yet? What did you think - did you love it?
Am I the last sewing blogger on earth to make it?


Friday, January 25, 2013

Sew...much!

I feel like I've got a lot going on in my brain & sewing room right now! I'm clinging to multiple sewing ideas, while also trying to do some refashioning and complete my Pendrell blouse. I actually took some time off work to give myself a long weekend for getting things done. However, in the sewing department, instead of being productive, I've ended up spending a lot of time marveling over all of the ideas for things I could work on. There's sewing project inspiration, potential refashioning projects waiting in a pile, and my in-progress Pendrell blouse.


Inspiration:
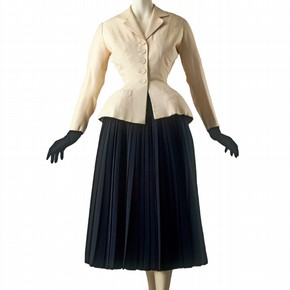
Ever since starting to read (yes, read - not just flip through the pretty, pretty pictures!) 100 Years of Fashion, one particular style has been stuck in my head. I know I've claimed the '60s as my best style decade for its more wearable, cute fashions, but who can resist the New Look.


1947 'Bar' by Dior -  V&A


Something about the fitted jacket and or blouse belted over an a-line or full skirt, idea won't get out of my mind. For some reason I'm picturing myself wearing this type of suit, maybe in dark blue, boarding an airplane? Don't ask. I've found a pattern that I'm dying to try, but then again, I think I could turn Gertie's jacket and skirt from her book into just as nice of a suit, and I wouldn't have to purchase any new patterns. But, just look...


Source: etsy.com via Susan on Pinterest


It's even from 1960! But, then there's also this lovely '50s pattern, too.


Source: etsy.com via Susan on Pinterest


Pretty! I'm not normally into suits, but these seem so smart and fun to wear. I'm especially liking the look of the jacket being nipped in at the waist and extending down to cover the hips, but not as long as a '40s style suit jacket. This look definitely helps create that hour-glass silhouette, but isn't revealing or racy. I'd call it ladylike but cute - at least that's how I'm hoping it would look on me.

Drooling over inspiration is a lot easier than completing a sewing project, though. Which tends to leave me with too many ideas to narrow down to a starting point and no progress on my current projects.

That said, I'm also being tempted by the Polka Dot Frock Fest that's been talked up over at Scruffy Badger Time.


I already own this pattern but have yet to sew it up. I also own some blue, polka dotted fabric that's been sitting forlorn in my stash for longer than I care to recall. Sounds like a match made in heaven, if you ask me.

If I do participate in the frock fest, I'm hoping to make my version something I could wear in my casual work setting without getting "...you're dressed up today" comments. I'm liking the view that's already illustrated in a   spotted fabric on the pattern envelope. Hmm... we'll just have to see.


Refashioning:
Earlier this month, I picked up this black, wool herringbone pencil skirt at the thrift store. I think it's from the '70s or '80s? It's fully lined, has pockets, and has a little strip of elastic on each side of the waistband  This might not sound like a plus, but the elastic is not super noticeable and makes a big difference in terms of comfort! It's a great length for a vintage office-y look, but my office is pretty casual, like I mentioned, and I'll get more wear out of this piece if I shorten it to above the knee. Not really a drastic refashion, more an alteration, but yeah. That's the plan.


Thrifted wool skirt with pockets  - closeup shows elastic at side-waist


I also have 4-ish other thrifted pieces just sitting in a pile, unwearable until refashioned into something better. I've tucked them away for now because I don't want to get sick of them before I even have time to start working on 'em. I easily get carried away with all of the pieces I see with "potential," rather than keeping in mind what I'll actually have time/energy to work on and will be able to really wear when completed.


Actually Working On...
In the meantime, through all of the swirling inspiration and project plans in my head, I've come to terms with the fact that trying to work on, or even just think about, too many things at once ends up being bad news for my sewing productivity. Once I finish my current project, the Pendrell blouse, I'll move on to address any lingering sewing inspiration or refashioning ideas. That may sound dull, but I think I'll go insane if I don't focus!


In-progress, creased and droopy, teal Pendrell


Today I'm planning to draft a collar to add to my teal rayon Pendrell WIP. Gertie's tutorial from her book seems pretty easy to follow for collar drafting, so, hopefully that'll turn out nicely. I am trying to make an effort to not rush through this relatively simple project. I don't want to be tempted to cut any corners and end up with a poorly finished piece that I won't enjoy wearing. Wish me luck!

Tuesday, August 14, 2012

Finished Project: Milly Wedding Guest Dress

If you'll recall, I left off with this dress having completed it but not being 100% pleased with the final product. The skirt is made from a piece of Milly silk that I snapped up from the remnants bin a little while back and this dress was my first time working with silk. The main part I wasn't pleased about on the final dress was the hem.


hem results

Here's what went down, as I'd previously reported:
This silk is so freakin' bouncy and buoyant and light and perky that it will not make a nice crease to save its life. I'm not used to working with silk but that perkiness was not an issue until I decided to hand-stitch a 3-inch hem. Also, though you can't see the actual thread on the right side of the hem from my stitching, you can see little dents from it. Damned shiny, sensitive silk. :( It doesn't look horrible IRL, but it makes me feel like foolish riff-raff who neither understands how nor deserves to work with nice material.

Well, after reaching out for suggestions (thank you all for your responses!), I was reluctant to un-do the hem I'd already sewn and was considering either continuing to press the hem to death to make it stop being poofy, or suck it up and re-do a much smaller hem.

What actually ended up happening?

I tucked the dress away in the closet, planning to revisit it before the wedding, and then promptly forgot about it.


the finished dress


That's right, I didn't end up making any changes to the completed dress after all.  However, if I were to sew the same thing again, I'd definitely do the smallest hem possible, as well as probably cut the bodice a size smaller (since it's cotton sateen with stretch to it), line at least the bodice, and cut the pink collar strips shorter and on the bias so that they fold over the curved neckline better and the tie isn't as long and floppy.

Changes I made to the pattern - New Look 6910:
  1. Gathered skirt (via Gertie's tutorial), not pleated
  2. Made gatheres at the top and little pleats in the bottom of the cap sleeves - they looked like little wings, IRL before. This little trick was inspired by Gillian's sleeves on her Peony.
  3. Drafted a pink collar inspired by the Beverly dress.
  4. Didn't add pockets like the above photo makes it look, but should have!

All in all, I'd say the dress was a success! I got some nice compliments at the wedding and the (...interesting) DJ even dedicated a song to me out of the blue, while mentioning my dress - hah! The song was the American Bandstand theme song, which I had no idea how to dance to, but oh well. Tom and I gave it our best fake 30 second swing dance and then discreetly left the dance floor.


Tom and I dancing to another song


There is a definite sock-hop-ish feel to the dress, which isn't a bad thing, but it's definitely... a thing! I'd originally styled it with a wide black belt at the waist and some retro heels, but ended up opting more for comfort and lost the belt before the end of the evening and didn't even make it out of the hotel room without switching to flats.


Styled with heels and a belt

Now that I've finished my wedding guest dress sewing, I almost don't know what to do with myself! "Almost" being the key word there. I'm making slow, lazy progress on my Simplicity 2154 blouse and may or may not be planning a (already anticipated to be belated) birthday shirt for Tom's birthday later this month. Luckily, Tom's brother is getting married in June 2013, so I'm not without future dress planning to do...even if it is a way into the future.


Thursday, June 7, 2012

Hooray for a hundred!

Almost exactly five months ago, I decided to take the plunge and started my very own sewing blog. I was nervous at the beginning and struggled a little bit to find my voice, but now I'm here and I can't really remember what my life was like without it. :)

I must say I'm quite surprised and grateful now to be celebrating having reached 100 followers - yay!

I just want to say a quick THANK YOU!!! 
...to blogland, the online sewing community, anyone who reads this, my mom, and the world in general. Thanks!! I really appreciate the comments you all make on my posts and the support and advice you've shared with me. I've loved "meeting" everyone who stops by my little neck of the internet woods!
 
Now, I'm planning to host my first giveaway to celebrate very soon. I'm thinking something a little bit vintage-y, but more on that in a bit! As I've mentioned, I'm still adjusting to my life/schedule with the new job, so sewing and blogging time are more scarce than I've been used to...but stick with me, it's coming. Promise!

In other news, here's another look at the top I'm working on lately. I've had to give it a little break for a couple days (not quite the same as throwing it in the "ehh" pile, more to prevent that from happening! -- absence makes the heart grow fonder?), but am now thinking I'll revisit those sloppily finished armholes and apply a bit of homemade bias tape to finish them nicely. I've also got some adjusting to do to the back to improve the fit before it can be worn.

You'll just have to take my word for it that this collar is not crooked in real life!
 
I've had a few comments on the fabric used for this project. I was lucky enough to have picked it up at the estate sale I visited back in April. It was hanging out in a huge bag of misc. fabric, along with the plaid I used for my Estate Sale Dress. I believe this teal-y/green-ish floral print is cotton...and perhaps from the 60s/70s? (based on the color scheme in the print), but that's about all the info I've got on it. There's no writing or marking in the selvage, so I don't have any more clues.

I can share my inspiration, though! 


As soon as I saw it, I was inspired by the collar on this cute dress from ModCloth.com. Does anyone know if there's a specific name for this type of collar? Is it just a pointed collar? Anyway, I just had to give it a try and I'm rather pleased with the results. What do you think?

Oh, and here's a quick little explanation on how I put them together, in case you were wondering.
I just made four of these little pieces, sewed them together wrong side to wrong side, like I was making two little pillows. I turned 'em right side out, made sure the corners were nice and pointy, and stitched them onto the shirt, just inside the neckline, so that the notch where the green arrow is was just peeking out over the neckline to the outside of the shirt.

sorry if this is blurry!!


Then, since I'd left the little side by the dotted red line open in order to flip it right side out, I turned that under and stitched where the red line is, attaching that whole back edge of the collar to the outside of the shirt, over the shoulder. I've seen this done a lot in RTW collared tops, and it's a shortcut I thought was worth taking!

That all seems rather wordy and in need of photos to clarify, which I can go into should anyone be interested. It was a very simple little project to make the collar pieces, so if you're thinking of trying out making up a collar, just go for it!